TensorFlow.js Inference in React on an image drawn with Konva
Inferencing on an ONNX model in a React App using ONNXRuntime Web.
July 26, 2024
08m Read
By: Abhilaksh Singh Reen

Table of Contents
With the introduction of TensorFlow.js it is now possible for us to run ML workflows (inference or training) right in the browser. Today, we'll be creating a React Application that allows us to draw a handwritten digit using Konva and then classify it using an ML model running on TensorFlow.js.
If you want to find out how this model was built and converted to TensorFlow.js, you can check out this Post, in which we train the model and export it to ONNX and TF.js.
Today's code is available right here.
React App Setup
We'll be using the create-react-app utility to set up our website. Inside your project directory, run:
npx create-react-app react-tensorflow-js-inferenceAnd then move into the newly created folder.
We have a lot of files here. However, during this tutorial, we'll be leaving most of these untouched. I'll only mention the files that I add or make changes to.
The Main Page
Speaking of adding new files, let's add a new page. Inside the src folder, create another folder called pages, and inside it create a file called Home.jsx. Let's add a simple component to it for now:
export default function Home() {
  return (
    <div>Home</div>
  )
}
Next, we work on src/App.js. We can get rid of most things in the file except the div with className="App" and place our Home component inside it.
import Home from "./pages/Home";

export default function App() {
  return (
    <div className="App">
      <Home />
    </div>
  );
}
That's all the changes we'll be making to App.js in this tutorial.
We can start the application using
npm startand head to localhost:8000 in our browser. You should see a page displaying the text Home.
Drawing
We've displayed the Home component in our application but it doesn't do much at the moment. Let's add a Konva Stage and set up some drawing logic.
import { useRef, useState } from "react";
import { Stage, Layer, Line } from "react-konva";

export default function Home() {
  const stageSize = Math.min(window.innerWidth * 0.9, window.innerHeight * 0.5);

  const [tool, setTool] = useState("pen");
  const [lines, setLines] = useState([]);
  const [strokeWidth, setStrokeWidth] = useState(15);

  const stageRef = useRef(null);
  const isDrawing = useRef(false);

  const handleMouseDown = (e) => {
    isDrawing.current = true;
    const pos = e.target.getStage().getPointerPosition();
    setLines([...lines, { tool, strokeWidth, points: [pos.x, pos.y] }]);
  };

  const handleMouseMove = (e) => {
    if (!isDrawing.current) {
      return;
    }

    const stage = e.target.getStage();
    const point = stage.getPointerPosition();
    let lastLine = lines[lines.length - 1];

    lastLine.points = lastLine.points.concat([point.x, point.y]);

    lines.splice(lines.length - 1, 1, lastLine);
    setLines(lines.concat());
  };

  const handleMouseUp = () => {
    isDrawing.current = false;
  };

  return (
    <div
      style={{
        width: "100%",
        display: "flex",
        flexDirection: "column",
        justifyContent: "flex-start",
        alignItems: "center",
      }}
    >
      <h1>Drawn Digit Prediction</h1>

      <Stage
        ref={stageRef}
        width={stageSize}
        height={stageSize}
        onMouseDown={handleMouseDown}
        onMousemove={handleMouseMove}
        onMouseup={handleMouseUp}
        style={{
          border: "1px solid black",
        }}
      >
        <Layer>
          {lines.map((line, i) => (
            <Line
              key={i}
              points={line.points}
              stroke="#000000"
              strokeWidth={line.strokeWidth}
              tension={0.5}
              lineCap="round"
              lineJoin="round"
              globalCompositeOperation={line.tool === "eraser" ? "destination-out" : "source-over"}
            />
          ))}
        </Layer>
      </Stage>

      <div
        style={{
          width: stageSize,
          marginTop: 10,
          display: "flex",
          flexDirection: "row",
          justifyContent: "space-evenly",
          alignItems: "center",
        }}
      >
        <select
          value={tool}
          onChange={(e) => {
            setTool(e.target.value);
          }}
          style={{
            padding: "8px",
            borderRadius: "4px",
            border: "1px solid #ccc",
            fontSize: "16px",
          }}
        >
          <option value="pen">Pen</option>
          <option value="eraser">Eraser</option>
        </select>

        <select
          value={strokeWidth}
          onChange={(e) => {
            setStrokeWidth(parseInt(e.target.value));
          }}
          style={{
            padding: "8px",
            borderRadius: "4px",
            border: "1px solid #ccc",
            fontSize: "16px",
          }}
        >
          <option value="1">1</option>
          <option value="3">3</option>
          <option value="5">5</option>
          <option value="10">10</option>
          <option value="15">15</option>
          <option value="20">20</option>
          <option value="30">30</option>
          <option value="40">40</option>
          <option value="50">50</option>
        </select>

        <button
          onClick={() => setLines([])}
          style={{
            padding: "8px 12px",
            borderRadius: "4px",
            border: "1px solid #ccc",
            background: "#ffffff",
            color: "#333",
            fontSize: "16px",
            cursor: "pointer",
          }}
        >
          Clear
        </button>
      </div>

      <button
        onClick={handlePredictButtonClick}
        style={{
          padding: "8px 12px",
          borderRadius: "4px",
          border: "1px solid #444444",
          background: "#eeeeee",
          color: "#333",
          fontSize: "16px",
          cursor: "pointer",
          marginTop: 10,
          marginBottom: 5,
        }}
      >
        Predict
      </button>
    </div>
  );
}
We've created a Stage and set up MouseDown, MouseUp, and Mousemove listeners for it. We also have a ref isDrawing that tracks whether or not we've currently pressed down the mouse on the stage. When the mouse is clicked on the stage (MouseDown), we set isDrawing to true and add a new line to lines with the current stroke and tool. This new line, right now, has a single point i.e. the point the mouse was clicked down on. In the Mousemove listener, we add the current point to the last line in the lines array. And finally, in the MouseUp listener, we just set isDrawing to false.
If we take a look at the Stage component, we have a Layer for displaying all our lines. For each of these, we have a Line component rendered with the points and the strokeWidth. We also have a globalCompositeOperation, that draws the lines with the pen tool and removes the ones with the eraser.
And, right below the Stage, we have some dropdowns for the drawing config, a button to clear everything, and a button to run the inference.
Great, we can now work on the Predict button. We'll create a state to store the current prediction and also display it right below the Predict button.
const [prediction, setPrediction] = useState(null);{prediction !== null && (
<h4
style={{
margin: 0,
}}
>
Probably a {prediction}
</h4>
)}Next, we write the logic for what happens when the Predict button is clicked in the handlePredictButtonClick function.
const handlePredictButtonClick = async (e) => {
const stageImageDataUri = stageRef.current.toDataURL();
// ...
setPrediction(0);
};Here, we have a bit of a problem. When we draw the image with a black stroke in Konva, it does not draw black on a white background. Instead, it's black on a transparent background. So, for the 4 channels of the image (R, G, B, A), R, G, and B are 0 everywhere (since the stroke is black) and alpha is 0 at all places except where there is a black stroke. Basically, we need to extract the Alpha channel and use it as the greyscale image for inference.
For the purpose of this tutorial, however, I want to draw the image on a temporary canvas as a debugging exercise, just to know if we're getting everything correct. Let's create this temporary canvas first. Add a ref and add a canvas component below the Predict button.
const canvasRef = useRef(null);<canvas ref={canvasRef} width={28} height={28}></canvas>Inference
Inside the src folder, create another folder called inferencing. Inside this folder, we'll create 2 files with some dummy functions inside them:
src/inferencing/imageProcessing.js
function preprocessImageData(imageDataArr) {
return "foo";
}
export { preprocessImageData };src/inferencing/recognizer.js
function recognizeDigit(preprocessedImageData) {
return {
success: true,
prediction: "bar",
};
}
export { recognizeDigit };Now, let's make use of these functions in the handlePredictButtonClick handler in src/pages/Home.jsx:
const handlePredictButtonClick = async (e) => {
const stageImageDataUri = stageRef.current.toDataURL();
const canvas = canvasRef.current;
const ctx = canvas.getContext("2d");
const img = new Image();
img.src = stageImageDataUri;
img.onload = () => {
const tempCanvas = document.createElement("canvas");
tempCanvas.width = 28;
tempCanvas.height = 28;
const tempCtx = tempCanvas.getContext("2d");
tempCtx.drawImage(img, 0, 0, 28, 28);
const imageData = tempCtx.getImageData(0, 0, 28, 28);
const imageArray = imageData.data;
// r(1, 1), g(1, 1), b(1, 1), a(1, 1), r(2, 1), g(2, 1), b(2, 1), a(2, 1), ...
const alphaChannelOnlyImageData = new ImageData(new Uint8ClampedArray(imageArray.length), 28, 28);
for (let i = 3; i < imageArray.length; i += 4) {
alphaChannelOnlyImageData.data[i] = 255;
alphaChannelOnlyImageData.data[i - 1] = imageArray[i];
alphaChannelOnlyImageData.data[i - 2] = imageArray[i];
alphaChannelOnlyImageData.data[i - 3] = imageArray[i];
}
ctx.putImageData(alphaChannelOnlyImageData, 0, 0);
const preprocessedImageData = preprocessImageData(alphaChannelOnlyImageData.data);
const inferencingResult = recognizeDigit(preprocessedImageData);
if (!inferencingResult.success) {
window.alert("Could not recognize digit.");
return;
}
setPrediction(inferencingResult.prediction);
};
};Preprocessing
The Konva Stage allows us to get a Data URI of the painted image, we then draw this on a canvas to resize it, get the ImageData, and extract only the alpha channel. We then preprocess the image array stored in ImageData.data and then pass it to the recognizeDigit function. We check if the inference was successful and then set the prediction.
Next, we can work on preprocessImageData in src/inferencing/imageProcessing.js.
import { tensor4d } from "@tensorflow/tfjs";
function preprocessImageData(imageDataArr) {
const redChannel = new Float32Array(28 * 28);
for (let i = 0; i < 28 * 28; ++i) {
redChannel[i] = imageDataArr[i * 4] / 255;
}
const redChannelTensor = tensor4d(redChannel, [1, 28, 28, 1]);
return redChannelTensor;
}
export { preprocessImageData };The TensorFlow model that we trained expects inputs of the shape [1, 28, 28, 1] (batch, x, y, channels). So, from the image data array, we extract any one of the red, green, or blue channels, divide it by 255 to convert the values to be between 0 and 1, and make it into a Tensor for the required shape.
Inside src/inferencing/recognizer.js, we can update the recognizeDigit function.
import { loadLayersModel } from "@tensorflow/tfjs";
import { indexMax } from "../utils/mathUtils";
const model = await loadLayersModel("http://localhost:3000/model-tfjs/model.json");
function recognizeDigit(preprocessedImageData) {
const probabilities = model.predict(preprocessedImageData).dataSync();
const prediction = indexMax(probabilities);
return {
success: true,
prediction: prediction,
};
}
export { recognizeDigit };When you export your model to TensorFlow.js, you'll get two files: a .json file containing the model architecture, and a .bin file containing the weights. I've put both of these in public/model-tfjs from where they can be served as static files.
Great, but what's this indexMax thingy? Our model outputs a list of 10 items that contain the probabilities of the classes that the model thinks the image could belong to. The class with the highest probability is what we claim to be the prediction. Since the classes are from 0 to 9, the index of the element is the class itself. So, we get the index of the max element of the array, similar to numpy.argmax in Python.
Here's the src/utils/mathUtils.js file
function indexMax(arr) {
if (arr.length === 0) {
return -1;
}
let max = arr[0];
let maxIndex = 0;
for (let i = 1; i < arr.length; i++) {
if (arr[i] > max) {
maxIndex = i;
max = arr[i];
}
}
return maxIndex;
}
module.exports = { indexMax };Since we've replaced our dummy functions with some actual logic, let's head back to Home.jsx and confirm if everything is connected. Here's the complete src/pages/Home.jsx file
import { useRef, useState } from "react";
import { Stage, Layer, Line } from "react-konva";
import { preprocessImageData } from "../inferencing/imageProcessing";
import { recognizeDigit } from "../inferencing/recognizer";
export default function Home() {
const stageSize = Math.min(window.innerWidth * 0.9, window.innerHeight * 0.5);
const [tool, setTool] = useState("pen");
const [lines, setLines] = useState([]);
const [strokeWidth, setStrokeWidth] = useState(15);
const [prediction, setPrediction] = useState(null);
const stageRef = useRef(null);
const isDrawing = useRef(false);
const canvasRef = useRef(null);
const handleMouseDown = (e) => {
isDrawing.current = true;
const pos = e.target.getStage().getPointerPosition();
setLines([...lines, { tool, strokeWidth, points: [pos.x, pos.y] }]);
setPrediction(null);
};
const handleMouseMove = (e) => {
if (!isDrawing.current) {
return;
}
const stage = e.target.getStage();
const point = stage.getPointerPosition();
let lastLine = lines[lines.length - 1];
lastLine.points = lastLine.points.concat([point.x, point.y]);
lines.splice(lines.length - 1, 1, lastLine);
setLines(lines.concat());
};
const handleMouseUp = () => {
isDrawing.current = false;
};
const handlePredictButtonClick = async (e) => {
const stageImageDataUri = stageRef.current.toDataURL();
const canvas = canvasRef.current;
const ctx = canvas.getContext("2d");
const img = new Image();
img.src = stageImageDataUri;
img.onload = () => {
const tempCanvas = document.createElement("canvas");
tempCanvas.width = 28;
tempCanvas.height = 28;
const tempCtx = tempCanvas.getContext("2d");
tempCtx.drawImage(img, 0, 0, 28, 28);
const imageData = tempCtx.getImageData(0, 0, 28, 28);
const imageArray = imageData.data;
// r(1, 1), g(1, 1), b(1, 1), a(1, 1), r(2, 1), g(2, 1), b(2, 1), a(2, 1), ...
const alphaChannelOnlyImageData = new ImageData(new Uint8ClampedArray(imageArray.length), 28, 28);
for (let i = 3; i < imageArray.length; i += 4) {
alphaChannelOnlyImageData.data[i] = 255;
alphaChannelOnlyImageData.data[i - 1] = imageArray[i];
alphaChannelOnlyImageData.data[i - 2] = imageArray[i];
alphaChannelOnlyImageData.data[i - 3] = imageArray[i];
}
ctx.putImageData(alphaChannelOnlyImageData, 0, 0);
const preprocessedImageData = preprocessImageData(alphaChannelOnlyImageData.data);
const inferencingResult = recognizeDigit(preprocessedImageData);
if (!inferencingResult.success) {
window.alert("Could not recognize digit.");
return;
}
setPrediction(inferencingResult.prediction);
};
};
return (
<div
style={{
width: "100%",
display: "flex",
flexDirection: "column",
justifyContent: "flex-start",
alignItems: "center",
}}
>
<h1>Drawn Digit Prediction</h1>
<Stage
ref={stageRef}
width={stageSize}
height={stageSize}
onMouseDown={handleMouseDown}
onMousemove={handleMouseMove}
onMouseup={handleMouseUp}
style={{
border: "1px solid black",
}}
>
<Layer>
{lines.map((line, i) => (
<Line
key={i}
points={line.points}
stroke="#000000"
strokeWidth={line.strokeWidth}
tension={0.5}
lineCap="round"
lineJoin="round"
globalCompositeOperation={line.tool === "eraser" ? "destination-out" : "source-over"}
/>
))}
</Layer>
</Stage>
<div
style={{
width: stageSize,
marginTop: 10,
display: "flex",
flexDirection: "row",
justifyContent: "space-evenly",
alignItems: "center",
}}
>
<select
value={tool}
onChange={(e) => {
setTool(e.target.value);
}}
style={{
padding: "8px",
borderRadius: "4px",
border: "1px solid #ccc",
fontSize: "16px",
}}
>
<option value="pen">Pen</option>
<option value="eraser">Eraser</option>
</select>
<select
value={strokeWidth}
onChange={(e) => {
setStrokeWidth(parseInt(e.target.value));
}}
style={{
padding: "8px",
borderRadius: "4px",
border: "1px solid #ccc",
fontSize: "16px",
}}
>
<option value="1">1</option>
<option value="3">3</option>
<option value="5">5</option>
<option value="10">10</option>
<option value="15">15</option>
<option value="20">20</option>
<option value="30">30</option>
<option value="40">40</option>
<option value="50">50</option>
</select>
<button
onClick={() => setLines([])}
style={{
padding: "8px 12px",
borderRadius: "4px",
border: "1px solid #ccc",
background: "#ffffff",
color: "#333",
fontSize: "16px",
cursor: "pointer",
}}
>
Clear
</button>
</div>
<button
onClick={handlePredictButtonClick}
style={{
padding: "8px 12px",
borderRadius: "4px",
border: "1px solid #444444",
background: "#eeeeee",
color: "#333",
fontSize: "16px",
cursor: "pointer",
marginTop: 10,
marginBottom: 5,
}}
>
Predict
</button>
{prediction !== null && (
<h4
  style={{
    margin: 0,
  }}
>
  Probably a {prediction}
</h4>
)}
<canvas ref={canvasRef} width={28} height={28}></canvas>
</div>
);
}
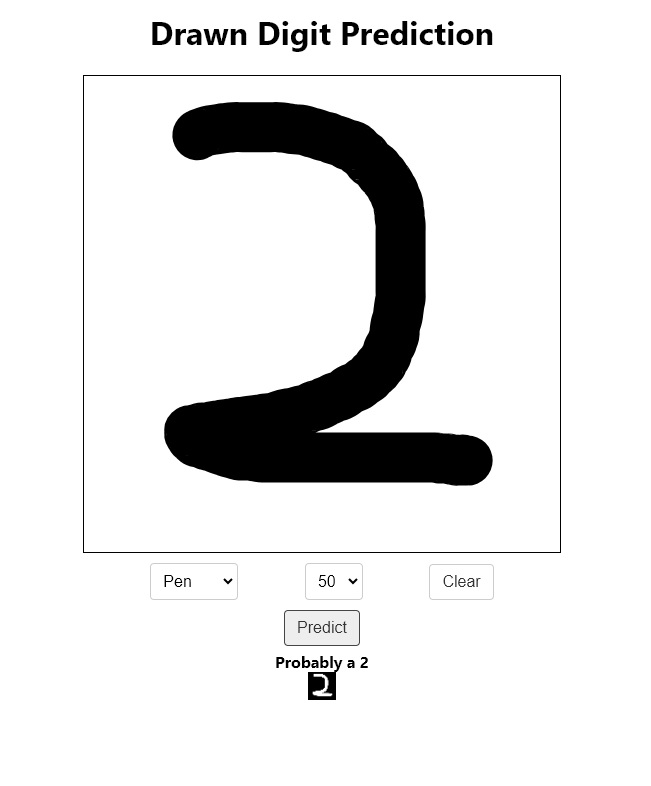
Head back to the web browser and refresh the page. Now, we can try drawing an image in the stage area and hit the predict button. After clicking the button, another image will appear below it, this one should be white on black, and it's what we're passing to the model for inferencing. More importantly, you should see the predicted digit appear on the screen.

Conclusion
Today, we've learned how to run ML inference on the client side right in a web browser. TensorFlow.js is not just restricted to this, it can do much more such as backpropagation as well as training.
In fact, TensorFlow.js is a complete ML framework and it's actually a bit overkill if we're using it for inference processes only. A much more lightweight option is to use onnxruntime-web as we have done in this Article.
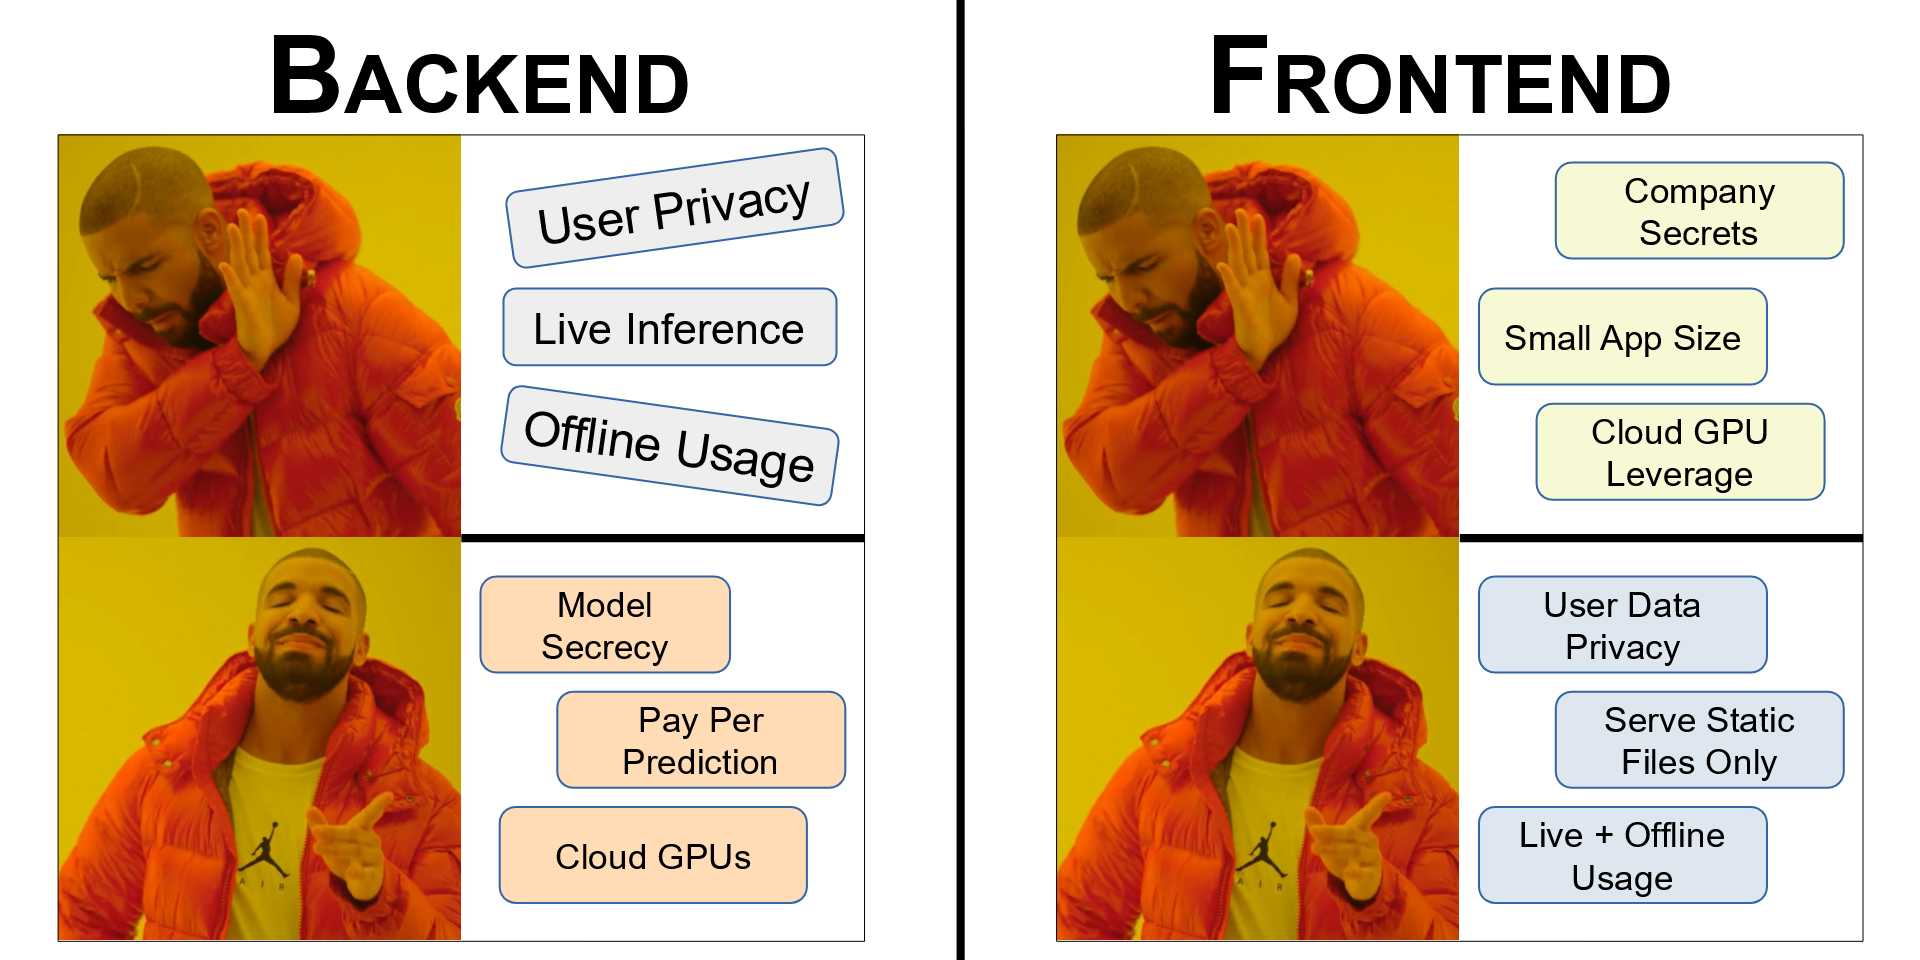
If you wanna know more about the advantages and disadvantages of having your ML models on the Frontend and the specific use cases in which each is definitely superior, you can check out this Post on a comparison of ML inference on the backend vs frontend.
See you next time :)
