Getting a segment via an API
Learn how to segment the loaded volume via an API running a ML model.
June 3, 2024
4 min Read
By: Abhilaksh Singh Reen

Table of Contents
In another post, we built a REST API that allowed us to segment CT volumes using TotalSegmentator. Today, we'll connect our Slicer Extension to work with this API.
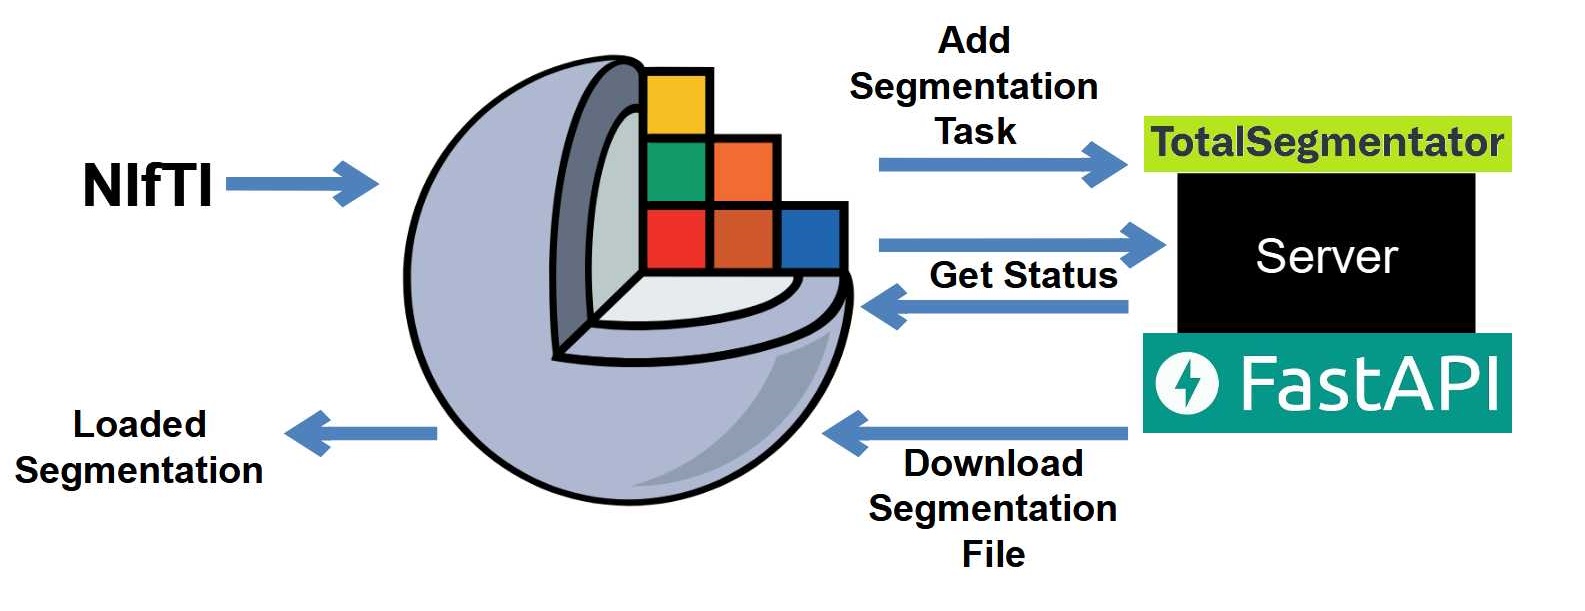
Here's an image describing how the system is supposed to work:

You can find the code for this project in this GitHub Repository.
API Setup
Make sure to have both the server and worker applications running as described in the original article. You can also follow the instructions given in the README of this GitHub Repository.
The UI
We'll edit the TutorialModule/resources/UI/TutorialModule.ui file to remove everything in the QHBoxLayout below the Load Volume button. Then, we'll add a new button as follows.
<item>
<widget class="QPushButton" name="segmentWithTsButton">
 <property name="text">
  <string>Segment with Total Segmentator</string>
 </property>
</widget>
</item>
Here's the entire TutorialModule.ui file.
<?xml version="1.0" encoding="UTF-8"?>
<ui version="4.0">
 <class>TutorialModule</class>
 <widget class="qMRMLWidget" name="TutorialModule">
  <property name="geometry">
   <rect>
    <x>0</x>
    <y>0</y>
    <width>316</width>
    <height>338</height>
   </rect>
  </property>

  <layout class="QVBoxLayout" name="verticalLayout">
   <item>
    <widget class="QLineEdit" name="volumePathTextBox"/>
   </item>

   <item>
    <widget class="QPushButton" name="loadVolumeButton">
     <property name="text">
      <string>Load Volume</string>
     </property>
    </widget>
   </item>

   <item>
    <widget class="QPushButton" name="segmentWithTsButton">
     <property name="text">
      <string>Segment with Total Segmentator</string>
     </property>
    </widget>
   </item>

   <item>
    <widget class="qMRMLSegmentEditorWidget" name="embeddedSegmentEditorWidget">
     <property name="autoShowSourceVolumeNode">
      <bool>true</bool>
     </property>
     <property name="maximumNumberOfUndoStates">
      <number>10</number>
     </property>
    </widget>
   </item>
   <item>
    <spacer name="verticalSpacer">
     <property name="orientation">
      <enum>Qt::Vertical</enum>
     </property>
     <property name="sizeHint" stdset="0">
      <size>
       <width>20</width>
       <height>40</height>
      </size>
     </property>
    </spacer>
   </item>
  </layout>
 </widget>
 <customwidgets>
  <customwidget>
   <class>qMRMLWidget</class>
   <extends>QWidget</extends>
   <header>qMRMLWidget.h</header>
   <container>1</container>
  </customwidget>
 </customwidgets>
 <resources/>
 <connections/>
</ui>
The Widget
In the TutorialModule/TutorialModule.py file, we'll remove references to the deleted UI elements from the TutorialModuleWidget class.
In the setup function, delete the following lines to remove connections of the drawCircle and drawSquare buttons.
self.ui.drawCircleButton.connect('clicked(bool)', self.onDrawCircleButtonClick)
self.ui.drawSquareButton.connect('clicked(bool)', self.onDrawSquareButtonClick)
We'll also remove the onDrawCircleButtonClick and the onDrawSquareButtonClick functions.
We'll also remove the following line from the getSegmentationNode function of the TutorialModuleLogic class that creates an empty segment.
segmentation.AddEmptySegment(self.proceduralSegmentId, "Procedural", None)Head to Slicer and hit Reload (make sure you have Developer mode enabled). Now, you should be able to load a volume and create segments manually.
Let's connect our segmentWithTsButton button to a handler function. In the setup function of the Widget class, add the following line right below where we connect the Load Volume button.
self.ui.segmentWithTsButton.connect('clicked(bool)', self.onSegmentWithTsButtonClick)Next, we'll define the click handler
def onSegmentWithTsButtonClick(self):
    qt.QApplication.setOverrideCursor(qt.Qt.WaitCursor)

    self.logic.segmentWithTotalSegmentatorApi()

    qt.QApplication.restoreOverrideCursor()
Make sure to import qt at the top of the file.
import qtThe Logic
From the TutorialModuleLogic class, we can remove the drawCircleSegmentOnSlice and drawSquareSegmentOnSlice functions and define four new functions that we'll be using for segmenting via our API.
def addSegmentationTask(self, volumePath):
    pass

def getSegmentationTaskUpdate(self, taskId):
    pass

def loadSegmentationFromUrl(self, segmentationFileUrl):
    pass

def segmentWithTotalSegmentatorApi(self):
    pass
Here's the workflow: our Widget class will call segmentWithTotalSegmentatorApi which will then call addSegmentationTask which will upload the loaded volume to the server. Then, segmentWithTotalSegmentatorApi will repeatedly call getSegmentationTaskUpdate until the task completes or fails. If and when the task completes, loadSegmentationFromUrl will be called which will download the segmentation from the provided URL and load it into the Segmentation Node.
To work with the API, we'll have to define some values in the __init__ function.
self.base_url = "http://localhost:8000"
self.api_base_url = "http://localhost:8000/api"
self.add_segmentation_task_endpoint = f"{self.api_base_url}/add-segmentation-task"
self.get_segmentation_task_result_endpoint = f"{self.api_base_url}/get-segmentation-task-result?task_id={{taskId}}"
Here's the entire __init__ function.
def __init__(self):
    """
    Called when the logic class is instantiated. Can be used for initializing member variables.
    """
    ScriptedLoadableModuleLogic.__init__(self)

    self.loadedVolumePath = None
    self.volumeNode = None
    self.segmentationNode = None
    self.segmentEditorNode = None

    self.base_url = "http://localhost:8000"
    self.api_base_url = "http://localhost:8000/api"
    self.add_segmentation_task_endpoint = f"{self.api_base_url}/add-segmentation-task"
    self.get_segmentation_task_result_endpoint = f"{self.api_base_url}/get-segmentation-task-result?task_id={{taskId}}"
Let's work on the addSegmentationTask function first.
def addSegmentationTask(self, volumePath):
    with open(volumePath, "rb") as f:
        files = {"file": f}
        addResponse = requests.post(self.addSegmentationTaskEndpoint, files=files)

    if addResponse.status_code != 206:
        return None

    addResponseData = addResponse.json()

    taskId = addResponseData.get('result', {}).get('taskId', None)
    return taskId
We open the loadedVolume as binary, read it, and then make a multipart request to the server's endpoint. In the response, we get a taskId, and we return it from the function.
Next up, we have the getSegmentationTaskUpdate function.
def getSegmentationTaskUpdate(self, taskId):
    getSegmentationTaskResultEndpoint = self.getSegmentationTaskResultEndpoint.replace("{{taskId}}", taskId)

    getStatusReponse = requests.get(getSegmentationTaskResultEndpoint)
    if getStatusReponse.status_code != 200:
        return {
            "status": "failed",
        }

    getStatusReponseData = getStatusReponse.json()

    return getStatusReponseData["result"]
Here, we're making a request to the endpoint that returns the task statuses. We simply check the status code of the request and return the result data that contains our status.
Our third function is loadSegmentationFromUrl and it's by far the most complicated one.
def loadSegmentationFromUrl(self, segmentationFileUrl):
    loadedVolumeDir = os.path.dirname(self.loadedVolumePath)
    segmentationSavePath = os.path.join(loadedVolumeDir, "segmentation.nii.gz")

    getSegmentationResponse = requests.get(segmentationFileUrl)

    if getSegmentationResponse.status_code != 200:
        slicer.util.errorDisplay("Could not download segmentation file from server.")
        return

    with open(segmentationSavePath, "wb") as f:
        f.write(getSegmentationResponse.content)

    if self.segmentationNode is not None:
        segmentationNode = self.segmentationNode

        slicer.mrmlScene.RemoveNode(segmentationNode) # remove the segmentation node from the scene

        # Remove other related nodes
        associated_nodes = slicer.util.getNodesByClass("vtkMRMLSegmentationDisplayNode")
        for node in associated_nodes:
            if node.GetSegmentationNode() == segmentationNode:
                slicer.mrmlScene.RemoveNode(node)

        # Check for remaining references to the segmentation node
        remaining_references = slicer.util.getNodesByClass("vtkMRMLSegmentationNode")
        for node in remaining_references:
            if node.GetAssociatedNodeID() == segmentationNode.GetID():
                slicer.mrmlScene.RemoveNode(node)

    self.segmentationNode = slicer.util.loadSegmentation(segmentationSavePath)
    self.segmentationNode.SetReferenceImageGeometryParameterFromVolumeNode(self.volumeNode)
We save the segmentation file in a file called segmentation.nii.gz in the same directory from where the loaded volume is located. After downloading the file, we can load it into a Slicer vtkMRMLSegmentationNode using the slicer.util.loadSegmentation function. However, before we load a segmentation, we want to make sure to get rid of the existing segmentation if we have one. In order to do so, we have the logic that lies inside the if self.segmentationNode is not None: block.
Finally, we can work on the segmentWithTotalSegmentatorApi function (the one that is called from the Widget class).
def segmentWithTotalSegmentatorApi(self):
    newTaskId = self.addSegmentationTask(self.loadedVolumePath)
    if newTaskId == None:
        print("Task add failed")
        slicer.util.errorDisplay("Failed to add segmentation task to server.")
        return

    segmentationTaskUpdate = {
        "status": "queued",
    }
    while segmentationTaskUpdate["status"] != "completed" and segmentationTaskUpdate["status"] != "failed":
        segmentationTaskUpdate = self.getSegmentationTaskUpdate(newTaskId)
        sleep(1)

    if segmentationTaskUpdate["status"] == "failed":
        slicer.util.errorDisplay("Server failed to segment the loaded volume.")
        return

    segmentationFileUrl = segmentationTaskUpdate["segmentationFileUrl"]
    self.loadSegmentationFromUrl(f"{self.baseUrl}/{segmentationFileUrl}")
The function performs three operations: adding a new segmentation task, repeatedly getting its status until it completes or fails, and then loading the segmentation from the received URL.
Testing (Manually)
Head back to Slicer and hit Reload. Then, load a volume by providing a volume path and clicking the Load Volume button. Once the volume is loaded, hit the Segment with Total Segmentator button. Once the segmentation process is completed, the segmentation should get loaded into Slicer. You will also see that a new file called segmentation.nii.gz has been created in the same directory as the loaded volume.
Conclusion
Congratulations! You have just learned how to interact with an API in a 3D Slicer module. This means that you now have the power to pretty much process your volumes in any way you like.
See you next time :)


